Two employment reports, both textbook at 15 minutes. Only one is still textbook by end of day.
Two G10 monthly jobs prints. Both look clean in the first fifteen minutes — five surprise buckets ordered correctly, tail medians near ±25–40 pips. By the New York close, their beat sides both hold. Their miss sides diverge: AUD Employment strengthens; CAD Employment collapses. Same category of release, opposite full-day behavior.
This is a follow-up to the CAD Employment / USDCAD post. That one called out a beat-holds-misses-fade asymmetry. AUD Employment on AUDUSD is worth looking at because it is also beat-persistent at end of day — but its miss side goes the other direction from CAD’s. Both events pass the 15-minute test. Only one still does at EOD.
The 15-minute shape is nearly identical
Here’s the AUD Employment / AUDUSD five-bucket table for the 15-minute window, straight from /api/v1/news-impact/stats:
| Bucket | n | 15m median | Pct up | EOD median |
|---|---|---|---|---|
| big_miss | 8 | -25.2 | 0% | -33.5 |
| small_miss | 39 | -19.9 | 15% | -21.6 |
| in_line | 77 | +0.1 | 51% | +0.7 |
| small_beat | 48 | +14.7 | 77% | +21.2 |
| big_beat | 26 | +31.7 | 85% | +21.4 |
Compare to CAD Employment on USDCAD at 15 minutes (from the previous post): big_miss +40p, small_miss +24p, in_line +4p, small_beat -30p, big_beat -41p. Both distributions step through zero in the correct direction with no detours. Both have 77–89%directional agreement in the tail buckets. On the 15-minute window alone, if you removed the pair labels you couldn’t tell them apart as trading opportunities.
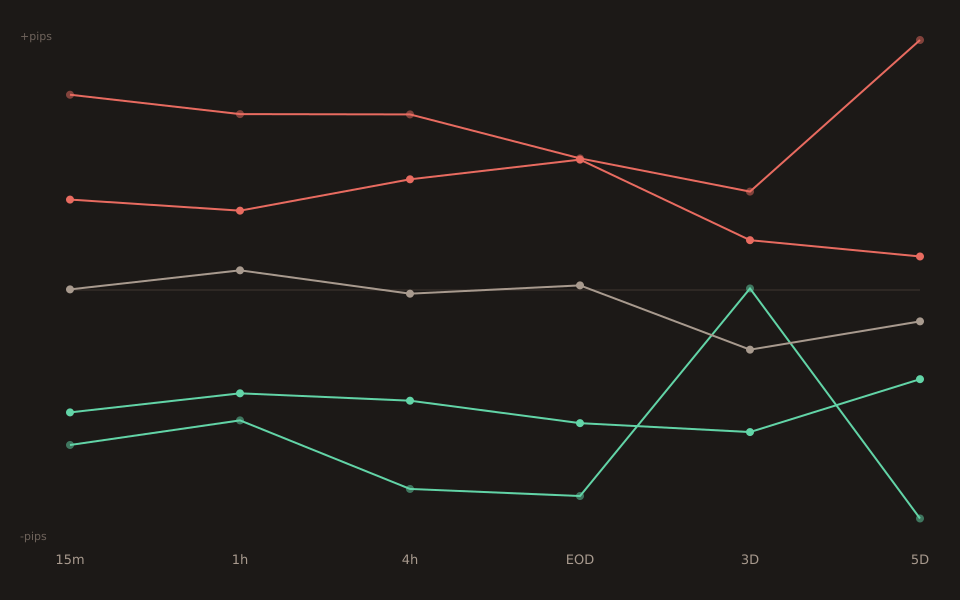
By end of day the miss side diverges
| Bucket | AUD/AUDUSD 15m | AUD/AUDUSD EOD | CAD/USDCAD 15m | CAD/USDCAD EOD |
|---|---|---|---|---|
| big_miss | -25.2 | -33.5 | +40.2 | +4.6 |
| small_miss | -19.9 | -21.6 | +24.2 | +10.5 |
| in_line | +0.1 | +0.7 | +3.8 | -0.9 |
| small_beat | +14.7 | +21.2 | -30.5 | -27.0 |
| big_beat | +31.7 | +21.4 | -41.0 | -33.4 |
Read the highlighted big_miss and small_miss rows. On AUDUSD, the miss-side move actually widens between 15m and EOD (big_miss -25p → -33p, small_miss -20p → -22p). On USDCAD, the same buckets fade hard (big_miss +40p → +5p, small_miss +24p → +11p). Both beat sides hold in both events. The divergence is entirely on the miss side.
The mechanism is almost certainly the session position of the release. AUD Employment prints at 01:30 UTC on Thursdays — the Asia session. The reaction runs through London and New York against the pre-existing move. CAD Employment prints at 12:30 UTC on Fridays — right into the NFP-adjacent US-open window. The USDCAD miss-side move (+40 pips in USDCAD = CAD selling off) then competes with the massive USD-side flows landing at the same clock, including whatever NFP prints on the first Friday of the month. That kind of overlap eats an intraday CAD miss for lunch.
What this doesn’t say
It doesn’t say the individual print will match the median. Recent AUD Employment big_miss prints have moved AUDUSD anywhere from -32 pips (the June 2020 print, z=-5.63, actual -228k jobs vs -105k consensus) to 0 pips (the March 2025 print, z=-3.41). The -25 pip median is where half of prints landed above and half below — it is not a prediction for any specific release.
It doesn’t say the small samples are precise. The AUD big_miss bucket is n=8 at 15m and n=7 at EOD. That’s well below the n=30 threshold the tool uses to mark a bucket as faint. The direction of the contrast (misses hold vs misses fade) is confirmed by the much larger neighboring small_miss buckets (AUD n=36 at EOD, CAD n=35), so the story is robust to the tail-sample worry — but the exact tail magnitudes should be treated as indicative, not decisive.
It doesn’t say all AUD releases behave this way.This is specifically AUD Employment Change on AUDUSD. AUD CPI, AUD GDP, and the RBA rate decision all have their own separate distributions in the tool, and there’s no reason to assume any of them share this exact EOD-durability shape.
How to use this
The contrast is the useful part. Two events that look identical under one measurement window can behave very differently on another. The practical read:
Pick your window before you pick your event.If you’re trading intraday (15m–1h), both events pass the clean-directional-shape test and are essentially interchangeable as setups. If you’re trading a hold-to-EOD or overnight position, AUD Employment misses have historically been the more durable directional edge; CAD Employment misses have not.
Don’t assume category = behavior.These are both “monthly employment change” prints. Being in the same event category buys you nothing: their EOD miss-side behavior is opposite, and you only know that if you look at each event on its own distribution in the tool rather than reasoning from category.
Open AUD Employment / AUDUSD → Free forever. No signup. No email required.